Monday, October 22, 2012

Summery Summary

 Whew!
That seemed very fast.  Here we are in October, so I thought I would post a summary of the work over the summer.  It was a busy one.  Check out some of the new outdoor spaces that our clients are enjoying.


A beautiful deck with wrap-around steps.


Also gained is a new dining area.


Putting a deck just a single step from grade really bridges the indoor with the outdoor.  The backyard is easily accesible from all sides of the deck.


The stellar stone work on both projects was done by Ultra-Lock.  I love the combination of decking and stone.


Bonus photo!  This deck used to feature those iron posts and railings that were prevalent in the 60's.  We changed them out with a new, low maintenance vinyl railing.  Looks sharp.

I hope you all had a great summer!  Here comes winter...

Friday, June 29, 2012

Art For Art's Sake

I recently had a unique opportunity.
Oakville based artist Michelle DeVilliers has ordered a number of pieces from Jacobson Construction.  A rather large craft table for painting sculpting storing etc, and a window seat with storage below.
When Michelle asked for some canvas storage, I suggested we make a trade...


This is the storage unit.  Approximately 8 feet tall by 7 feet wide.  Swivel casters make it easy to move about.  By the way, these casters are the best I have ever encountered.  Smooth running, even under considerable weight, and both the swivel and the wheel lock.


The frame is soft maple to match the table and window seat.


The shelves are fully adjustable and lock in place to keep the interior cabinet rigid.


The painted canvases slot into the shelves for easy access.


And here is the trade.  Michelle's Above the Falls now hangs on our dining room wall.

Thanks so much Michelle.  My wife and I are thoroughly enjoying the piece.


Friday, June 22, 2012

Built-in Bookshelves... and more

Jacobson Construction presents...


This wall of built-ins was designed to fulfill several functions.  The upper portion is for books and is accessed with a rolling ladder.  The bottom is split.  A desk in the middle is flanked by two sets of drawers.  They are capped with antique pine.


A view of the installed work.
LED pot lights were installed along the top for display items, and underneath to light the workspace.  The switches (the brushed nickel discs visible on the facing panel) are three step touch dimmers.

The rolling ladder is custom made, with hardware from Richelieu.  It rides along the length of the piece on the black, aluminum rail.


These boards were salvaged by Historic Lumber.  They are floor joists from a circa 1860 building.

The happy accident with these boards is that as I prepared them I noticed that the boards had knots in identical locations.  This seemed quite odd and impossible, until I realized that the boards were from the same tree.  The tree was most likely milled on-site, so the fact that some of the floor joists are from the same tree is not remarkable in itself, but what is remarkable is that they have stayed together all these years and found themselves laminated together here. 


I enjoy the counterpoint between the antique timbers and crisp, white, inset drawers.  The piece was designed to look more like furniture than cabinets.  Note the tapered legs.


The nightstand.
I wanted it to match the built-ins, but stand on its own as well.

Tuesday, April 10, 2012

Finishing Rack

My shop is quite small.  The work that I do also demands a wide variety of capabilities.
One of those capabilities is spray finishing.  Ideally this would be done in a separate building altogether (mostly because of dust), but for now I need to be able to finish cabinets or furniture with a certain degree of efficiency.  Hopefully the addition of that capability does not take away from the shop's primary function: woodworking.


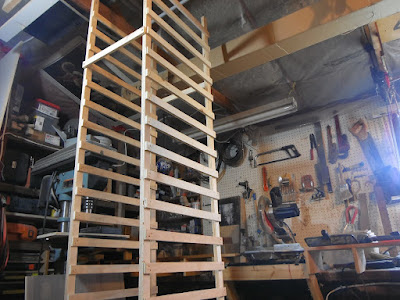
Here is a picture of my new racks.  The A-frame is for panels and other larger objects.


This little guy is for drying doors and drawer fronts, or smaller objects.  I would finish these items on the table, then transfer them to the rack for drying.  It holds about 20 items in a relatively small space.

It also comes apart and stores away.  The removal of 6 screws accomplishes this.


Here is the A-frame rack loaded and ready for spraying.


A close-up of the pipe that supports the rack.  The whole thing just hangs from the ceiling and rests against the edge of the work table.


This is the fun part.  The rack folds up and away when not in use.

Hooray!

Wednesday, March 28, 2012

Drawers on a Budget

Well I was putzing about in my shop the other day, and I realized that my router table needed a cabinet of some kind.  Every time I use the thing I have to spend time getting all the dust off of every thing, and the whole area is suffering from a distinct lack of organization.

Drawers would be nice.


Here is a picture of the two drawers.  Note the primitive construction.  Butt joints.  A few screws and glue hold them together.  Notice that the drawer bottoms are not flush with the sides, but stick out a bit.


Those will run in the grooves seen here.  I set the table saw to a certain depth, and cut the width to match the thickness of my drawer bottoms.


I also took the time to wax my runners.  They will run much smoother this way.


Et voila!  Somewhere to put my stuff.


Actually it looks not half bad.
This project cost me exactly $0.  The plywood was scrounged from what I had in the shop.  It only took me a few hours to make it up.

Saturday, March 24, 2012

This is interesting...

We are working on some floating cabinets.
Floating, ie not touching the floor.  Just fastened to the wall.


They are essentially two separate cabinets at this point.  The one on the left is the inside.  The one on the right is the outside.


It's kind of like the chassis of a car and its body.  They are built separately...


...then put together.
But wait!  First we must finish the outside with a white lacquer.  It'll be easier while the pieces are apart.


Taa daa!
Here are the cabinets finished and installed.


This unit will house various pieces of entertainment equipment.  It has a receptacle built in to it, as well as various cables communicating with the tv above the fireplace.

Also visible are the sliding glass doors.  The tracks are dadoed into the cabinet so the frame can keep its clean look.


A nice addition to the home.

Tuesday, February 28, 2012

Window Seat

Jacobson Construction was commissioned by artist Michelle DeVilliers to build a window seat that allowed for hidden storage below.


We designed this for her.  The top is made from 6/4 maple to match the craft table that is already in the space.  The base is designed to match the five-panel shaker doors that are throughout the house.


The final result... I feel like sitting down.

The space seen where the shoe mould is missing is for an air vent.  Electrical outlets were brought from the wall to the face of the cabinet.


Each leg of the bench top was laminated as one piece, then cut into individual "lids".  That way the grain of the maple is continuous.


There are two lids on one side and three on the other.  Each uncovers it's own compartment.

Can't see any hinges?  They're invisible.  Each one is mortised in to the back edge of the lids.


A neat trick.  Soft closing stays from Lee Valley add a nice touch.

Monday, February 20, 2012

Make it Flat

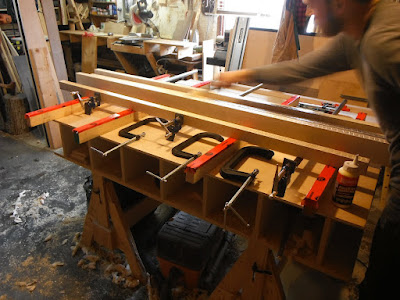
I am trying out a new technique for laminating.  Rather than gluing one or two joints at a time, I decided to do all of them at once.
This 6/4 soft maple is for the seat of a bench for client Michelle DeVilliers.  It has been thicknessed and edge-joined and is ready for laminating.


Laid out underneath the boards are some straightened pieces of spruce with taped edges.  The tape keeps the glue from sticking.


Lots of glue.  I spread it on and roll it out.  Both sides of the joint get glue.


Now we use complimentary pieces on top.  These also have taped edges.  Clamping these to each other will force the bench top to be flat.  I can tighten the perpendicular clamps and the entire top is laminated in one session.  Of course, the most important part of the whole operation is a flat work table.  Your laminated top will only be as flat as the table that you assemble it on.


After the lamination, we flatten with a jack plane.

Friday, January 20, 2012

Cross Table


A brand new design from Jacobson Construction.


A side table made from recycled timbers, metal legs, and a glass top.


These timbers I had left over from the renovation at my mother's house.  The woodworking here is no great trick.  It is held together with a single lap joint at the middle.  Said joint is not even glued or fastened in any way.  Just a dry fit.  The legs are scavenged from a scrap heap.


Overall a simple and pleasant table.

Monday, January 9, 2012

A New Fishbone Table!

Fishbone?

I first saw one of these tables in a Fine Homebuilding article.  Author Mike Maines had one set up in a driveway.  I was very quick to copy it.  It has a set of folding legs underneath it, so I can take it to job sites easily.  I have it set to the height of my job site table saw, so it also acts as an out feed table.  The main purpose of the fishbone however, is breaking down sheet goods.  For those of us who cannot afford a giant table saw with a sliding table and a shop big enough to hold it, we need another way...


This is my new fishbone table!  I used a couple of my adjustable horses as the base.  The picture above has the top on.  In this form, it is an out feed table or an assembly space.


Here you can see why I keep saying fishbone.  The spine runs down the middle.  The ribs run on either side.

Now here is the exciting bit.

The problem with breaking down sheet goods with one of these tables and a plunge cut saw, is the cross cuts.  You basically have to measure and square every cut.  It can be quite tedious.  They do manufacture special multifunction tables for this purpose, but they cost nearly $700.


  So I made my own.  Shown above is a half sheet of plywood (it was cut to 22" the long way), and a few pegs to keep the plywood and the track square to one another.


The pegs sit in pockets attached to the ribs of the table.


They are removable, of course.


An out feed stand helps support the work.


And in the background here you can see a stop block set up.  I can now feed the stock in and make repetitive cuts without measuring.  And each cut will be square.

All in all I am happy so far with the system.  It will speed production considerably.