Monday, September 19, 2011

Sanding!

Is sanding boring?
Yup.


I prefer to sand salvaged timbers by hand.

Sounds crazy?

These timbers are not flat.  A belt sander won't really do the trick.  One could use a random orbit sander and get into more of the contours, but in my opinion the finish is vastly inferior to sanding by hand, and not much faster.  So unless you like to see tiny little circles on your work, just sand it by hand.

Now, just one of these timbers takes approximately two hours of hand-sanding to produce a decent finish (up to 120 grit), so it is important to take steps to ensure one's own comfort...

Tape your fingers.
They will get hot from the friction.  They will also get blisters.  I prefer a little bit of electrical tape.  It stays on even when sweaty.

Expect slivers.
Old, dry timbers are not smooth.  That's why we're sanding them.  Keep a needle or a sharp knife (or whatever your favourite sliver-digger-outer is) on hand to remover the unwanted guest.

Wear a dust mask.
Dust matter is bad for you.  Also timbers left in out in the prairie have bird s*#t on them.  So you probably don't want that in your lungs.


Don't work so hard.
Change the paper when it gets dull.  Also change the hand that you are sanding with.  One the first things that you will notice getting fatigued is your fingers.  The constant pressure exerted at the end of your digits will catch up to you quickly.  The solution?  Don't press down on your fingers.  Instead, use your other hand as a weight.  Rest it on top of your sanding hand's fingers.  The weight from this hand is often enough for the sandpaper to work.  No extra pressure required.

Turn your brain off.
You are not going to need it here.  Best to save it for other things.


Bye bye!

Sunday, September 18, 2011

How to make antique timbers...

I love using salvaged lumber.

I don't know why.

Perhaps because I like history.  I also like the colours.  Something special happens to wood that is aged.

As mentioned in the previous blog, the mantle has an interesting story.  It (as well as other timbers for my mother's renovation) were acquired from the elevators at Dankin, Saskatchewan.


This is Dankin.
According to the Saskatchewan Heritage Foundation, this particular elevator was built in 1924.  These elevators served as a depot for the local farmers to drop off their grain.  The grain was generally shipped east.  Many of these elevators are now out of use, and in some cases the towns that were around them are gone.  The prairies are full of dead or dying communities.  I don't say this to be disparaging in any way.  Life is not easy out here.  Some places simply won't last.

Now if one wants to build a grain elevator in Saskatchewan in 1924 one has an obvious problem: lack of timber.  The prairies are distinctly lacking in trees.  This is only speculation but I am guessing the timbers came from Ontario, and I am guessing by their smell and colour that they are in the pine family.  Also all of the timbers that we salvaged from Dankin are heartwood.  That is, they are from the centre of the tree. This means that most likely when they were milled in Ontario, the good wood was kept for furniture or flooring or what-have-you, and the remaining heartwood (which is unstable, subject to checks, splits, twist, etc.) was sold to the rail company for relatively cheap, then shipped west to build grain elevators.


Want timbers?
One of the owners of this project happens to own this elevator, so we had access.  Some of the timbers were just lying around.  12x6 pine!  This is not something that can be purchased, and here it is, old and grey and waiting...


How do you make antique timbers?
First build an elevator.  Then stop using that elevator.  Leave that elevator to feel the full brunt of prairie weather (hot and dry, dry and cold, dry and windy...) for about 85 years.

Then salvage and enjoy.


Friday, September 9, 2011

Preparations


Away we go!
My mother's garage has been taken over!


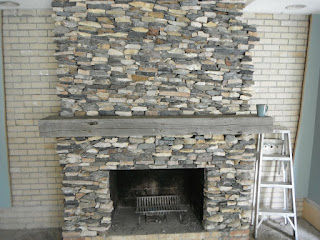
This is the fireplace as it stands.  The plan is to knock out the brick on either side, thus opening up the space.  Considerable work has been done here already, including all the stone work and the new mantle.

Note: That mantle has a very interesting story, but we will cover that in another post.


The view looking towards the back of the fireplace.  That railing is to be removed.


Got falling masonry?
Better protect the stairs!


Flooring is removed...


Lay down some protection for the hardwood...


Hoarding!
The entire area is cordoned off with plastic from the rest of the house.  We are about to make a lot of dust.  Some will escape, but every effort is made to keep it to a minimum.


The stairs are covered with a temporary plywood floor.  This provides a stable place to work.  Pictured above is a quick-cut saw.  If one wants to cut masonry or concrete, this is the best way to do it.

Warning: running a gas-powered engine (even a small one) indoors is dangerous!  Ensure proper ventilation.  Open windows, doors, also run big fans.  A build-up of carbon monoxide can obviously be deadly.


The cut is made.
A small amount of water is run through the saw while cutting.  This keeps the dust down as well as helps to lubricate the cut.


Once the cuts are made, we bring out the rotary hammer and start removing bricks.


Voila!
The wall is gone.

Thursday, September 8, 2011

Pergola Part 2


Bring your friends!
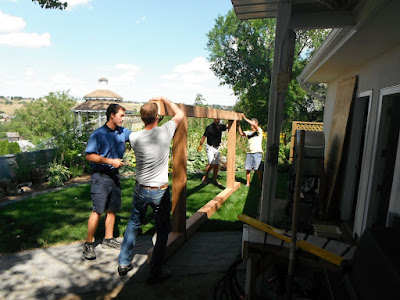
Pergolas are heavy.  Those are 6x6 timbers, after all.


Heave Ho!


The entire frame is placed on top of the posts.


8" lags are driven through the top of the beams into the posts.  Actually every subsequent layer receives the same treatment.  Once all three layers are fastened, the bolt heads are caulked to protect from moisture.


And there it is.  The finished pergola.


Shadows fall on and through the structure.


A nice look at the joinery.  In this shot, you can see the through tenons, the lapped joints at every layer, as well as some of decorative bevelling on the middle layer (purlins).