Sunday, December 18, 2011

New Shelves!

Acck!  The asymmetry is killing me!


This is my friend's Liam and Tricia's bedroom.  There is a chimney going through it.  Not so much an issue, but it is off to one side.  They put their bed up against it and only one of them can sit up.  The other one is always losing pillows in the gap.

So they decided to straighten it out.  They wanted to extend one side of the obstacle with a false wall, basically matching the nook on the right with one on the left.  Then we made up some floating night-stands and open shelves to fill the nooks.


A very pleasing result.  This will give them lots of storage.  The drawers on the nightstands are 20" wide x 20" long x 8" tall inside and on full extension, soft-closing slides.


We went out to see our friend Allan Bousfield at Historic Lumber to get these beautiful timbers.
The open shelves are salvaged from a circa 1860 granary.  The edges are gouged out because the mice chewed through it to get at the grain.


The night-stand tops are big, 2" thick slabs.  These came from the walls of an old barn.


The look is completed with some nice cup pulls.

Thanks Liam and Tricia!

Sunday, December 11, 2011

Finished Table

Jacobson Construction is very pleased with the results of this project.


Here is the craft table requested by artist Michelle DeVilliers.  It fills the space of her studio quite well.


A view of the expanse of the table-top.  5 feet wide by 9 feet long.


From the other direction.  The shelves are open from both sides to allow easy access.


4 inch casters make moving the table a breeze... as much as moving a 300+ lb table can be a breeze.


A nice look at the braces that hold the whole thing together.  Form and function.

Thanks Michelle!
Enjoy the workspace!

Thursday, December 1, 2011

Expansion

Necessity is the mother of invention.

Sometimes a project comes along that forces one to expand his capabilities.  This table definitely falls into that category.


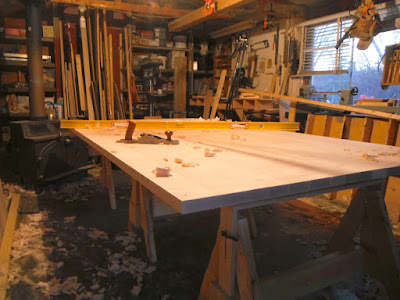
That's a big table.  5 feet wide by 9 feet long by 1 1/2 inches deep.  Solid maple.
I laminated together two halves, then glued those halves together.  The next problem is flattening such a thing.  My current work table has some issues that won't allow me to do it.

It isn't big enough to support that top.
It's not quite sturdy enough, either.  It was originally designed to be a portable table, and thus is equipped with folding legs.  Folding legs have too much wiggle for what I am about to do.
Lastly it is too tall.  It stands at 36", whereas I need about 24".  See, in order to flatten this top I have to get on it with hand planes.  Hand planing requires considerable weight, and because the top is 5 feet wide, and I have to keep my weight on it while reaching halfway across, I need to get it down lower.

So.  It needs to be held up at 24", and it has to be sturdy.


Let's build some horses.  Three of them, to be exact.  One to support either end of the top, plus one more in the middle.  Legs are cut and joints are lapped.  Lapping offers a far superior joint than just a butt-joint.


A series of A-frames are assembled. 


Now this is the interesting part.  The top also needs to be held flat.  It is pretty hard to flatten anything if it is sitting on an un-level surface.  So I bought some nifty cam clamp mechanisms from Lee Valley Tools. These are similar to the clamp on a bike seat that holds the height of a seat-post.  Installing these allows me to adjust the top of each horse and make it level, even if the floor/ground is not.

These beauties will come in handy, and not just for this project.

Wait!
I have one more problem!  How am I going to pick the top up, get the old work table out from underneath it, then set up the new horses underneath?
The top weighs over 200 lbs.


Aha!
I knew my Bachelor of Fine Arts would come in handy some day!
Look!  The Backstage Handbook, from my 1st year of theatre school!

Page 99 has a very helpful list of rigging set-ups.  The gun-stock purchase gives me a mechanical advantage of 2:1, with some loss on friction.


Up, up and away!


Now I can get to work.  The top is planed first of all across the grain (called traversing).  Then at a 45 degree angle to the grain.  Then at the other 45 degree angle.  And finally it is smoothed with the grain.

All told the planing took about 2 days.

More to come...

Thursday, November 17, 2011

Furniture Shop


Jacobson Construction is opening their furniture shop!

It has always been a dream of mine to build custom furniture.  I am happy to now offer this service to my clients.  The craft table above is designed for Oakville based artist Michelle DeVilliers.

The design is based on a bench for woodworking, albeit with rather large dimensions.  The top is 5 feet by 9 feet!  Below is plenty of storage for canvases, supplies, etc.  The entire table will also disassemble, as something this size will not easily fit through doors.

More to come.  This table will present some unique challenges...

Wednesday, November 2, 2011

Fun in the Crawl Space

Argh!
My feet are cold!


Then maybe your crawl space is lacking a little insulation.
Here is one.  It does have some insulation, but not enough.  The biggest problem though, is some pesky vents in the outside walls.
Back when this house was built (1960), the code called for vents into the crawl space.  So in the summer you open the vents, and in the winter you close them.  But those vents are only 1/16" tin, so a "closed" vent isn't going to keep the cold out... at all.

So, let's seal up everything.


Start with the headers.  You can lose a lot of heat through these.
We put a layer of R14 batt insulation...


Followed by a layer of 2" extruded polystyrene.  Total R-value is 24.  The edges are sealed with spray-foam.


The walls are covered floor to ceiling with the same 2" insulation.  The seams are taped and all edges/joints are sealed up with spray-foam.  We are looking to make the space air-tight.

A nice rolling cart helps, too.  The space is only 4' high, so a seat with wheels and a tray help to get around without wrecking your knees.


Sometimes you have to get creative.  This is the valve for the exterior hose bib.  Can't cover that up.


And there it is.  Clean, dry, and warm.

Wednesday, October 5, 2011

Progress


This is the renovation as it stands.  The timbers are installed and finished.  Glass panels were used instead of a traditional spindle, so as not to block the view.  The stone work is nearly done, and is really unique.  Co-owner Pat Craney spent hours picking rocks from various locations in Canada, then dragging them back to The Hat (Medicine Hat) where they found a resting spot on the fireplace.
Great job, Pat.


The view from the new dining room.  The carpet was removed and we put down a nice, porcelain tile.  The new hearth lends considerable weight.


Can't wait to come back and take some pictures when it is all finished.

Thanks Mom,
J+A+S

Closet Magic

As a consequence of removing walls from my mother's living room, we ended up losing some bookshelves.  The solution was to install some built-in shelves inside an existing hall closet.  That hall closet also backed on to a bedroom closet, so we took the opportunity to renovate that as well.

We started by knocking down the wall in between the two closets. then building a new wall to make the bedroom closet bigger.  After all, the bookshelves are only 14" deep, so they don't need very much room.


Of course, when we invade the hall closet, the items that were stored there need a home in the new closet.  We packed in some nice, open shelving on the right of the closet...


And the left of the closet is a well-organized clothing closet, complete with two closet rods, and some open shelving for sweaters and or shoes.


And on the other side we installed the bookshelves.  These were trimmed with more of our antique timbers, so that they are tied in with the rest of the space.

New paint colours to come...

Saturday, October 1, 2011

Timbers Up

Now that we have sanded all that antique timber, it is time to install it.

The plan is to frame the new openings in the wall with some big, 12x6 timbers.  The new stair rail will also be constructed of lumber from the same location in Dankin.
(See post "How to Make Antique Timbers")


One of the challenges of installing these newel posts is that there is no wood to fasten it to.  Underneath is only concrete.  So we start by drilling into the concrete with a 1/2" bit.


We repeat this on the bottom of the posts.


We then used a piece of re-bar as a dowel.  Both sides were generously slopped with construction adhesive (that stuff sticks to wood, metal, and concrete very well).  The floor where the base of the post will land is also smeared with glue.  The posts are double-checked for plumb and and the glue is left to cure... 24 hours at least.

This technique worked quite well.  The posts are rock-solid.


And now for your viewing pleasure...

My friend Warren and I are going to pick up a 14'x12"x6" beam and place it across the top of the opening.  The plan, again is to provide a huge frame... like a big picture frame.

Enjoy...


Monday, September 19, 2011

Sanding!

Is sanding boring?
Yup.


I prefer to sand salvaged timbers by hand.

Sounds crazy?

These timbers are not flat.  A belt sander won't really do the trick.  One could use a random orbit sander and get into more of the contours, but in my opinion the finish is vastly inferior to sanding by hand, and not much faster.  So unless you like to see tiny little circles on your work, just sand it by hand.

Now, just one of these timbers takes approximately two hours of hand-sanding to produce a decent finish (up to 120 grit), so it is important to take steps to ensure one's own comfort...

Tape your fingers.
They will get hot from the friction.  They will also get blisters.  I prefer a little bit of electrical tape.  It stays on even when sweaty.

Expect slivers.
Old, dry timbers are not smooth.  That's why we're sanding them.  Keep a needle or a sharp knife (or whatever your favourite sliver-digger-outer is) on hand to remover the unwanted guest.

Wear a dust mask.
Dust matter is bad for you.  Also timbers left in out in the prairie have bird s*#t on them.  So you probably don't want that in your lungs.


Don't work so hard.
Change the paper when it gets dull.  Also change the hand that you are sanding with.  One the first things that you will notice getting fatigued is your fingers.  The constant pressure exerted at the end of your digits will catch up to you quickly.  The solution?  Don't press down on your fingers.  Instead, use your other hand as a weight.  Rest it on top of your sanding hand's fingers.  The weight from this hand is often enough for the sandpaper to work.  No extra pressure required.

Turn your brain off.
You are not going to need it here.  Best to save it for other things.


Bye bye!

Sunday, September 18, 2011

How to make antique timbers...

I love using salvaged lumber.

I don't know why.

Perhaps because I like history.  I also like the colours.  Something special happens to wood that is aged.

As mentioned in the previous blog, the mantle has an interesting story.  It (as well as other timbers for my mother's renovation) were acquired from the elevators at Dankin, Saskatchewan.


This is Dankin.
According to the Saskatchewan Heritage Foundation, this particular elevator was built in 1924.  These elevators served as a depot for the local farmers to drop off their grain.  The grain was generally shipped east.  Many of these elevators are now out of use, and in some cases the towns that were around them are gone.  The prairies are full of dead or dying communities.  I don't say this to be disparaging in any way.  Life is not easy out here.  Some places simply won't last.

Now if one wants to build a grain elevator in Saskatchewan in 1924 one has an obvious problem: lack of timber.  The prairies are distinctly lacking in trees.  This is only speculation but I am guessing the timbers came from Ontario, and I am guessing by their smell and colour that they are in the pine family.  Also all of the timbers that we salvaged from Dankin are heartwood.  That is, they are from the centre of the tree. This means that most likely when they were milled in Ontario, the good wood was kept for furniture or flooring or what-have-you, and the remaining heartwood (which is unstable, subject to checks, splits, twist, etc.) was sold to the rail company for relatively cheap, then shipped west to build grain elevators.


Want timbers?
One of the owners of this project happens to own this elevator, so we had access.  Some of the timbers were just lying around.  12x6 pine!  This is not something that can be purchased, and here it is, old and grey and waiting...


How do you make antique timbers?
First build an elevator.  Then stop using that elevator.  Leave that elevator to feel the full brunt of prairie weather (hot and dry, dry and cold, dry and windy...) for about 85 years.

Then salvage and enjoy.


Friday, September 9, 2011

Preparations


Away we go!
My mother's garage has been taken over!


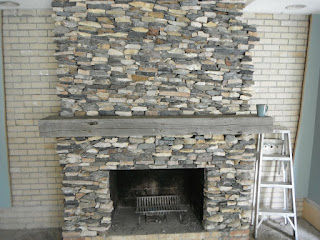
This is the fireplace as it stands.  The plan is to knock out the brick on either side, thus opening up the space.  Considerable work has been done here already, including all the stone work and the new mantle.

Note: That mantle has a very interesting story, but we will cover that in another post.


The view looking towards the back of the fireplace.  That railing is to be removed.


Got falling masonry?
Better protect the stairs!


Flooring is removed...


Lay down some protection for the hardwood...


Hoarding!
The entire area is cordoned off with plastic from the rest of the house.  We are about to make a lot of dust.  Some will escape, but every effort is made to keep it to a minimum.


The stairs are covered with a temporary plywood floor.  This provides a stable place to work.  Pictured above is a quick-cut saw.  If one wants to cut masonry or concrete, this is the best way to do it.

Warning: running a gas-powered engine (even a small one) indoors is dangerous!  Ensure proper ventilation.  Open windows, doors, also run big fans.  A build-up of carbon monoxide can obviously be deadly.


The cut is made.
A small amount of water is run through the saw while cutting.  This keeps the dust down as well as helps to lubricate the cut.


Once the cuts are made, we bring out the rotary hammer and start removing bricks.


Voila!
The wall is gone.

Thursday, September 8, 2011

Pergola Part 2


Bring your friends!
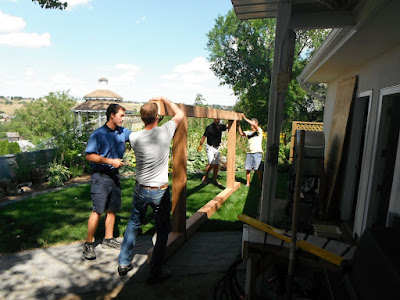
Pergolas are heavy.  Those are 6x6 timbers, after all.


Heave Ho!


The entire frame is placed on top of the posts.


8" lags are driven through the top of the beams into the posts.  Actually every subsequent layer receives the same treatment.  Once all three layers are fastened, the bolt heads are caulked to protect from moisture.


And there it is.  The finished pergola.


Shadows fall on and through the structure.


A nice look at the joinery.  In this shot, you can see the through tenons, the lapped joints at every layer, as well as some of decorative bevelling on the middle layer (purlins).